

How To Add Xaml File In Visual Studio 2019
This browser is no longer supported.
Upgrade to Microsoft Edge to have advantage of the latest features, security updates, and technical support.
Create a "Hello, World!" app (XAML)
This tutorial teaches you how to use XAML and C# to create a unproblematic "Hello, World!" app for the Universal Windows Platform (UWP) on Windows. With a single project in Microsoft Visual Studio, you can build an app that runs on all versions of Windows ten and Windows xi.
Here you lot'll acquire how to:
- Create a new Visual Studio project that targets Windows 10 and the UWP.
- Write XAML to modify the UI on your start folio.
- Run the projection on the local desktop in Visual Studio.
- Use a SpeechSynthesizer to make the app talk when you printing a button.
Before yous start...
- What'southward a Universal Windows app?
- Download Visual Studio (and Windows). If yous need a hand, learn how to go gear up.
- We also assume you're using the default window layout in Visual Studio. If you change the default layout, you tin can reset it in the Window carte past using the Reset Window Layout command.
Annotation
This tutorial is using Visual Studio Community 2017. If you are using a dissimilar version of Visual Studio, it may look a picayune unlike for you.
Step 1: Create a new project in Visual Studio
-
Launch Visual Studio.
-
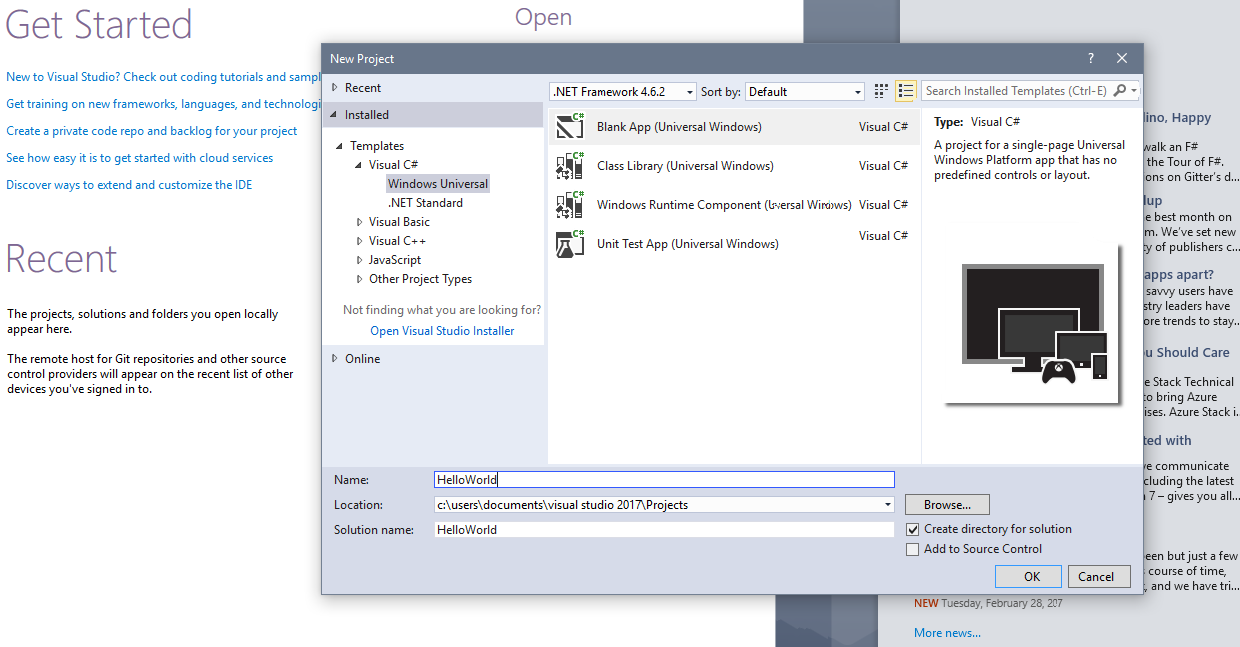
From the File carte, select New > Project to open the New Project dialog.
-
From the list of templates on the left, choose Installed > Visual C# > Windows Universal to see the list of UWP projection templates.
(If you don't see whatever Universal templates, y'all might be missing the components for creating UWP apps. You can repeat the installation process and add UWP support by clicking Open up Visual Studio installer on the New Projection dialog. Run across Get gear up upward.)

-
Choose the Bare App (Universal Windows) template, and enter "HelloWorld" as the Name. Select OK.
Notation
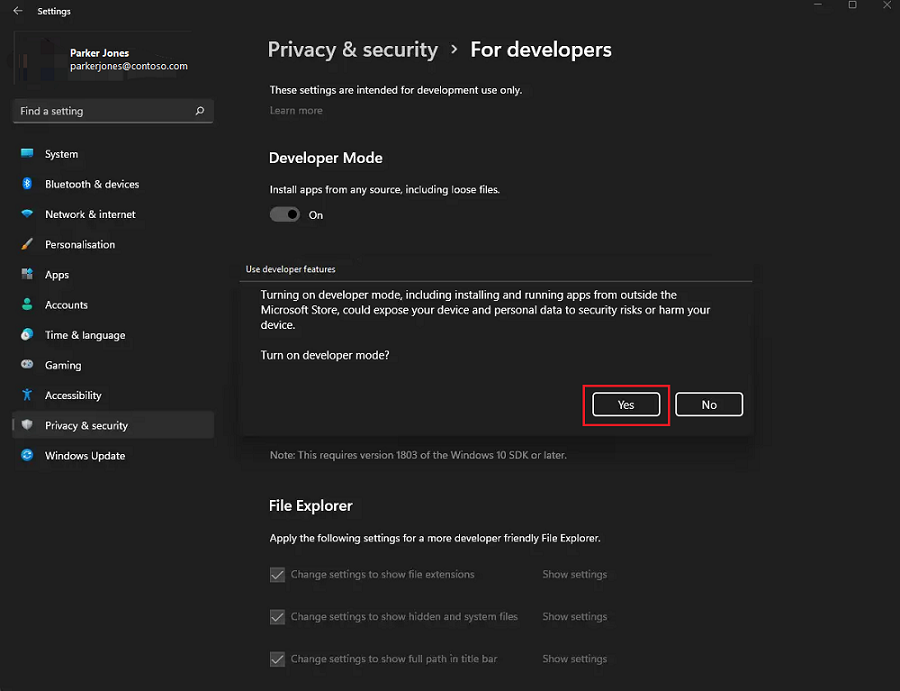
If this is the first fourth dimension you lot have used Visual Studio, yous might meet a Settings dialog request you to enable Developer fashion. Developer manner is a special setting that enables sure features, such as permission to run apps directly, rather than merely from the Shop. For more information, delight read Enable your device for development. To continue with this guide, select Developer mode, click Yes, and close the dialog.
-
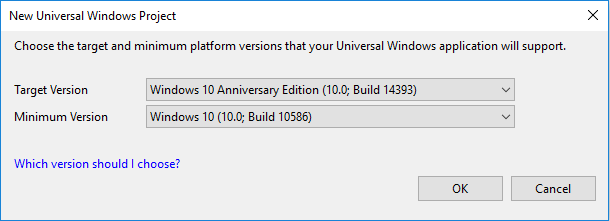
The target version/minimum version dialog appears. The default settings are fine for this tutorial, so select OK to create the projection.
-
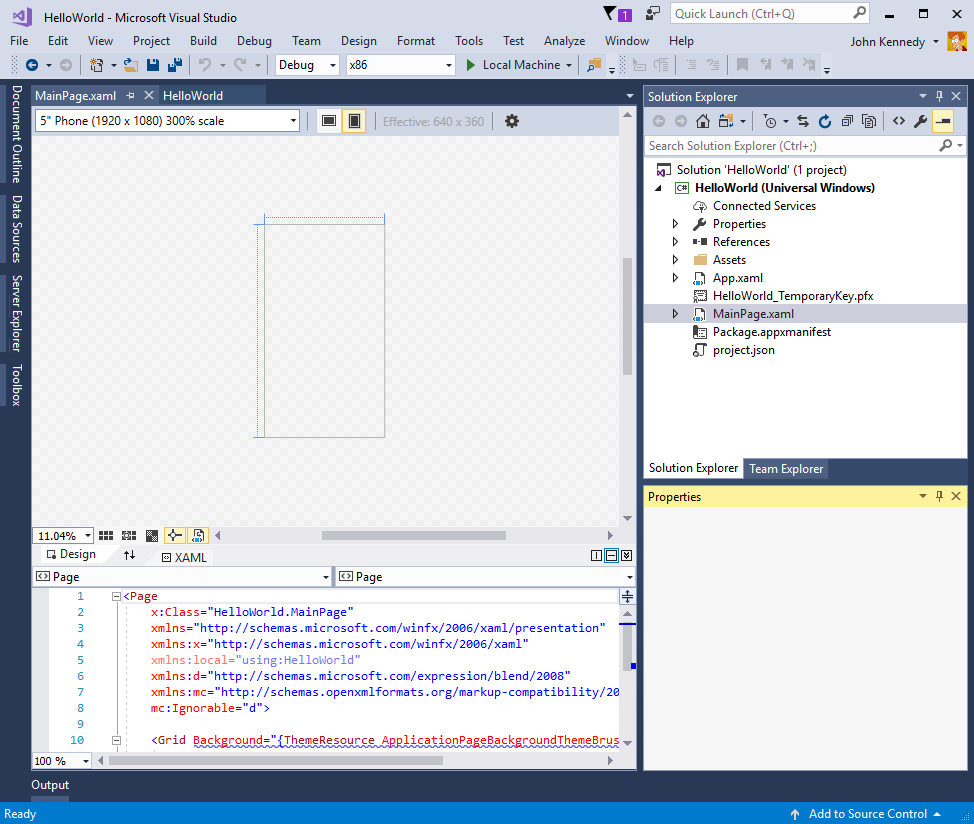
When your new project opens, its files are displayed in the Solution Explorer pane on the right. You may need to choose the Solution Explorer tab instead of the Properties tab to see your files.
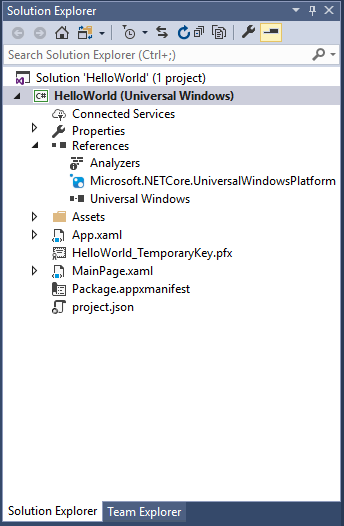
Although the Bare App (Universal Window) is a minimal template, it still contains a lot of files. These files are essential to all UWP apps using C#. Every project that you create in Visual Studio contains them.
What's in the files?
To view and edit a file in your projection, double-click the file in the Solution Explorer. Expand a XAML file but like a binder to see its associated code file. XAML files open in a split view that shows both the design surface and the XAML editor.
Annotation
What is XAML? Extensible Awarding Markup Language (XAML) is the language used to ascertain your app'due south user interface. It can exist entered manually, or created using the Visual Studio design tools. A .xaml file has a .xaml.cs code-behind file which contains the logic. Together, the XAML and code-backside make a complete course. For more information, meet XAML overview.
App.xaml and App.xaml.cs
- App.xaml is where yous declare resources that are used across the app.
- App.xaml.cs is the code-behind file for App.xaml. Similar all code-backside pages, information technology contains a constructor that calls the
InitializeComponentmethod. You don't write theInitializeComponentmethod. Information technology's generated by Visual Studio, and its main purpose is to initialize the elements declared in the XAML file. - App.xaml.cs is the entry point for your app.
- App.xaml.cs also contains methods to handle activation and interruption of the app.
MainPage.xaml
- MainPage.xaml is where y'all define the UI for your app. You can add elements straight using XAML markup, or you can employ the blueprint tools provided by Visual Studio.
- MainPage.xaml.cs is the lawmaking-behind page for MainPage.xaml. It's where you add together your app logic and outcome handlers.
- Together these ii files define a new class called
MainPage, which inherits from Page, in theHelloWorldnamespace.
Packet.appxmanifest
- A manifest file that describes your app: its name, description, tile, first folio, etc.
- Includes a listing of dependencies, resource and files that your app contains.
A set of logo images
- Avails/Square150x150Logo.scale-200.png and Wide310x150Logo.scale-200.png correspond your app (either Medium or Wide size) in the start menu.
- Assets/Square44x44Logo.png represents your app in the app list of the start menu, task bar and job manager.
- Avails/StoreLogo.png represents your app in the Microsoft Store.
- Avails/SplashScreen.scale-200.png is the splash screen that appears when your app starts.
- Avails/LockScreenLogo.scale-200.png tin exist used to represent the app on the lock screen, when the system is locked.
Step two: Add together a push
Using the designer view
Let's add a button to our page. In this tutorial, you piece of work with just a few of the files listed previously: App.xaml, MainPage.xaml, and MainPage.xaml.cs.
-
Double-click on MainPage.xaml to open it in the Design view.
Yous'll notice there is a graphical view on the top part of the screen, and the XAML code view underneath. You can make changes to either, but for now we'll utilize the graphical view.
-
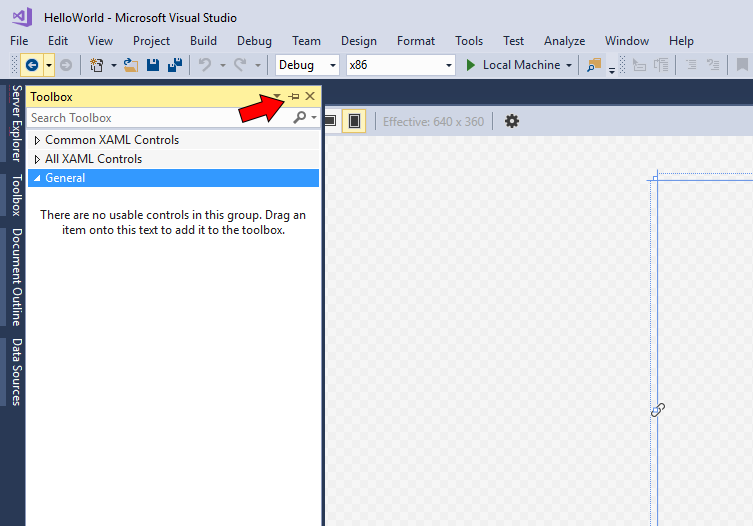
Click on the vertical Toolbox tab on the left to open up the listing of UI controls. (Y'all tin can click the pivot icon in its title bar to go along it visible.)
-
Aggrandize Common XAML Controls, and drag the Push button out to the middle of the design canvas.
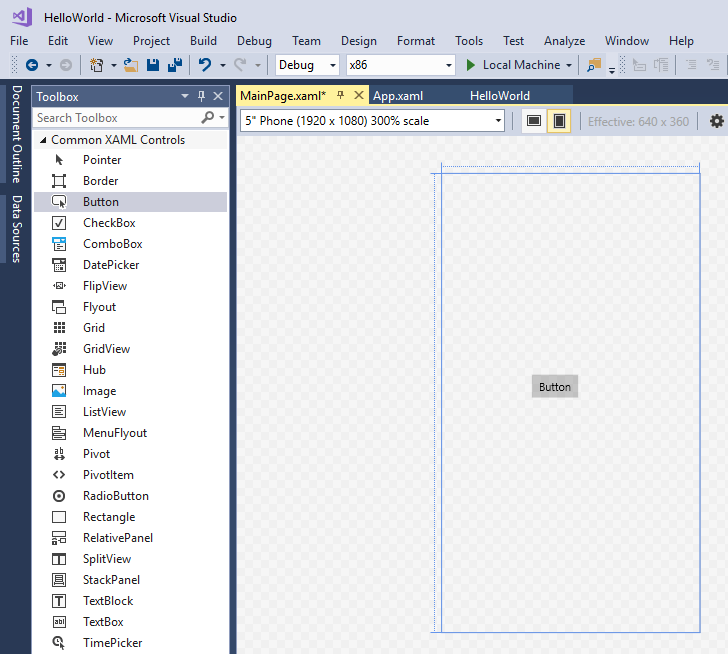
If y'all expect at the XAML code window, you'll see that the Button has been added at that place besides:
<Push ten:Name="push" Content="Button" HorizontalAlignment="Left" Margin = "152,293,0,0" VerticalAlignment="Summit"/> -
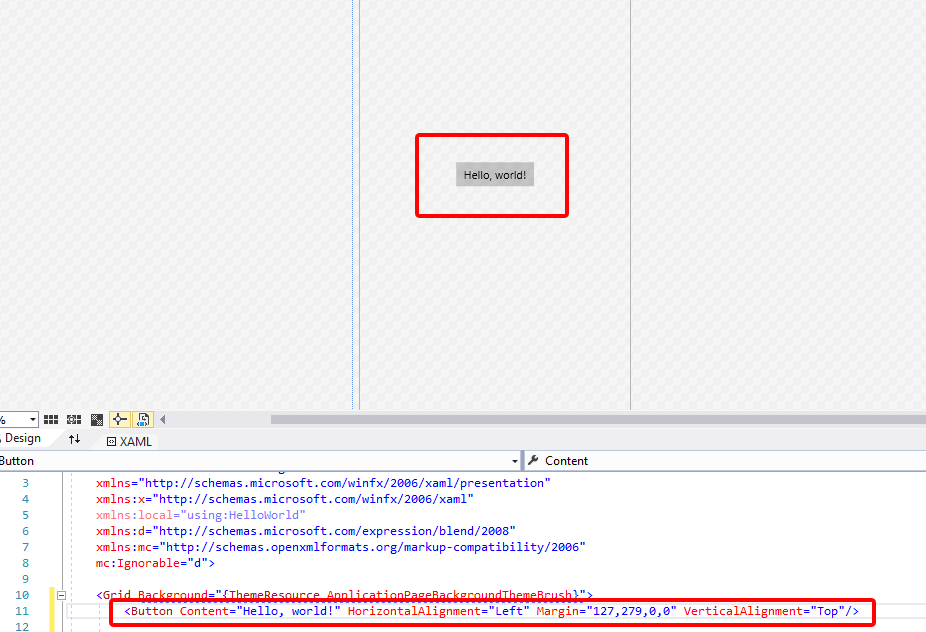
Change the button's text.
Click in the XAML code view, and modify the Content from "Button" to "How-do-you-do, globe!".
<Push button x:Name="button" Content="Hello, world!" HorizontalAlignment="Left" Margin = "152,293,0,0" VerticalAlignment="Acme"/> Observe how the button displayed in the design sail updates to display the new text.
Stride iii: Kickoff the app
At this point, you've created a very uncomplicated app. This is a good fourth dimension to build, deploy, and launch your app and see what it looks like. Yous can debug your app on the local car, in a simulator or emulator, or on a remote device. Here's the target device menu in Visual Studio.

Offset the app on a Desktop device
By default, the app runs on the local machine. The target device carte du jour provides several options for debugging your app on devices from the desktop device family.
- Simulator
- Local Machine
- Remote Machine
To starting time debugging on the local machine
- In the target device card (
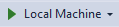 ) on the Standard toolbar, make sure that Local Machine is selected. (It's the default selection.)
 - Click the Offset Debugging button (
 ) on the toolbar.
–or–
From the Debug menu, click Get-go Debugging.
–or–
Press F5.
The app opens in a window, and a default splash screen appears first. The splash screen is defined past an image (SplashScreen.png) and a groundwork colour (specified in your app'due south manifest file).
The splash screen disappears, and then your app appears. Information technology looks similar this.

Press the Windows fundamental to open the Start menu, and so evidence all apps. Notice that deploying the app locally adds its tile to the First card. To run the app again after (not in debugging style), tap or click its tile in the Commencement menu.
It doesn't do much—however—but congratulations, you've built your beginning UWP app!
To stop debugging
Click the Cease Debugging push ( ) in the toolbar.
–or–
From the Debug carte, click Stop debugging.
–or–
Shut the app window.
Step 4: Event handlers
An "outcome handler" sounds complicated, but it's just some other name for the code that is called when an issue happens (such as the user clicking on your button).
-
Cease the app from running, if you haven't already.
-
Double-click on the push button control on the design sail to make Visual Studio create an event handler for your push.
Yous tin of course, create all the code manually too. Or you can click on the button to select it, and look in the Properties pane on the lower right. If you switch to Events (the trivial lightning bolt) you tin add together the name of your event handler.
- Edit the issue handler code in MainPage.xaml.cs, the lawmaking-behind page. This is where things get interesting. The default event handler looks similar this:
private void Button_Click(object sender, RoutedEventArgs eastward) { } Let'due south change it, so information technology looks like this:
private async void Button_Click(object sender, RoutedEventArgs due east) { MediaElement mediaElement = new MediaElement(); var synth = new Windows.Media.SpeechSynthesis.SpeechSynthesizer(); Windows.Media.SpeechSynthesis.SpeechSynthesisStream stream = await synth.SynthesizeTextToStreamAsync("Hello, Globe!"); mediaElement.SetSource(stream, stream.ContentType); mediaElement.Play(); } Make certain the method signature at present includes the async keyword, or y'all'll get an error when you try to run the app.
What did we but practice?
This code uses some Windows APIs to create a speech communication synthesis object, and and so gives it some text to say. (For more information on using SpeechSynthesis, see the SpeechSynthesis namespace docs.)
When y'all run the app and click on the button, your computer (or telephone) will literally say "Hello, Globe!".
Summary
Congratulations, you've created your first app for Windows and the UWP!
To learn how to employ XAML for laying out the controls your app will apply, try the grid tutorial, or leap straight to side by side steps?
Come across Besides
- Your first app
- Publishing your UWP app.
- How-to articles on developing UWP apps
- Code Samples for UWP developers
- What's a Universal Windows app?
- Sign upward for Windows business relationship
Feedback
Submit and view feedback for

How To Add Xaml File In Visual Studio 2019,
Source: https://docs.microsoft.com/en-us/windows/uwp/get-started/create-a-hello-world-app-xaml-universal
Posted by: callahanutmacksmay.blogspot.com
0 Response to "How To Add Xaml File In Visual Studio 2019"
Post a Comment