

How To Add An Image In Davinci Resolve
In this tutorial, I will show y'all how to overlay an image in Davinci Resolve.
Simply put we are going to add together an image on peak of a video!
- Open up the "Media Pool" on the "Edit" page of Resolve.
- Add together the video clip to the timeline.
- Add the overlay image to the timeline one rail to a higher place the video.
- Click on the epitome in the timeline to select it.
- Open up the "Inspector" tab, and become to the "Transform" options.
- Arrange the "Zoom" and "Position".
To overlay an image in Davinci Resolve, just add the image to the timeline, one video runway to a higher place the video. Then, in the "Inspector" tab, adjust the "Zoom" and "Position" values, to arrange the size and position of the overlay image.
Hither's a more detailed clarification including pictures:
(You lot'll also learn how to animate motion and change the shape of the overlay image)
Detailed Explanation:
Starting time, brand sure to exist on the "Edit" page:

Open the "Media Puddle" in the left-manus top corner.
So locate the files you are going to utilise for your video on your figurer.
To import them to Resolve, select the ones you want, and drag them into the greyness area in the "Media Pool", like in the film below.
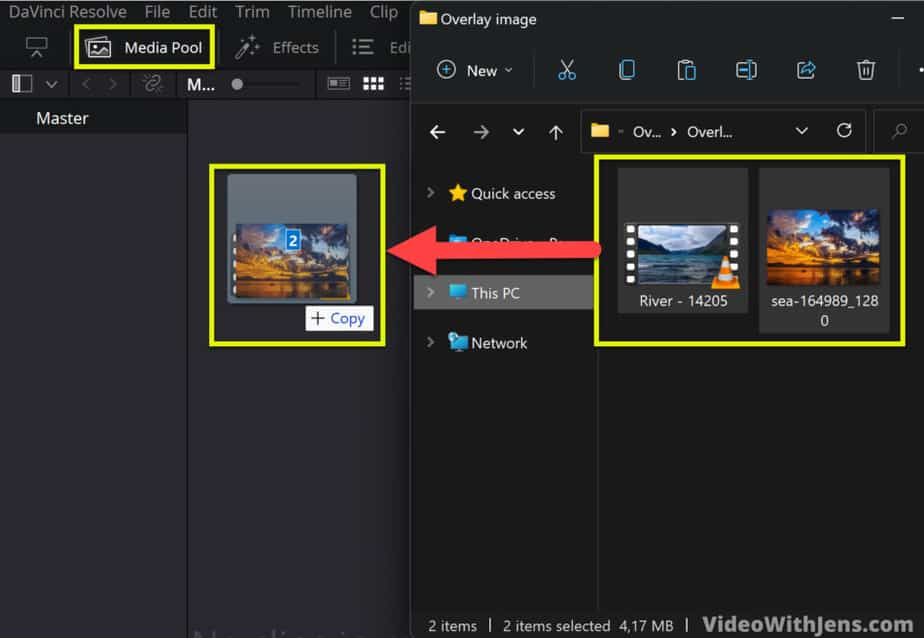
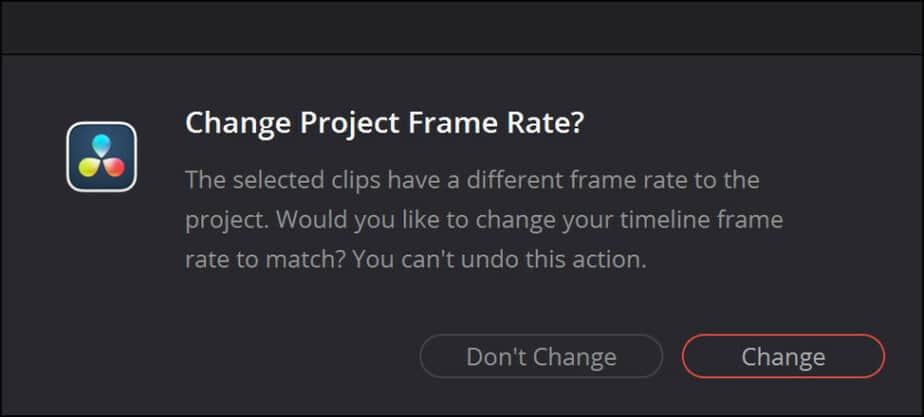
If these are the first files you are importing, y'all'll become the question of if you want the project to match the frame charge per unit of the clips yous're importing.
Click "Modify" if all your files are the aforementioned framerate, otherwise, the best affair is to set the frame charge per unit manually!
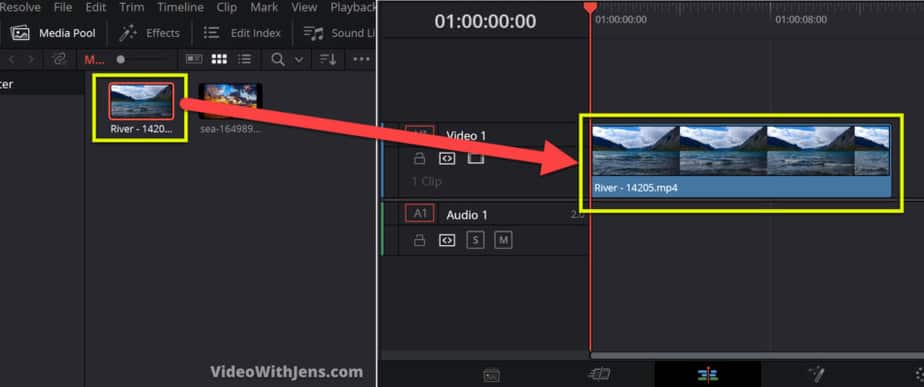
Add together the clips to the timeline by dragging them from the "Media Pool" and dropping them in the timeline like in the picture.
In this instance, you lot desire to add the video beginning!
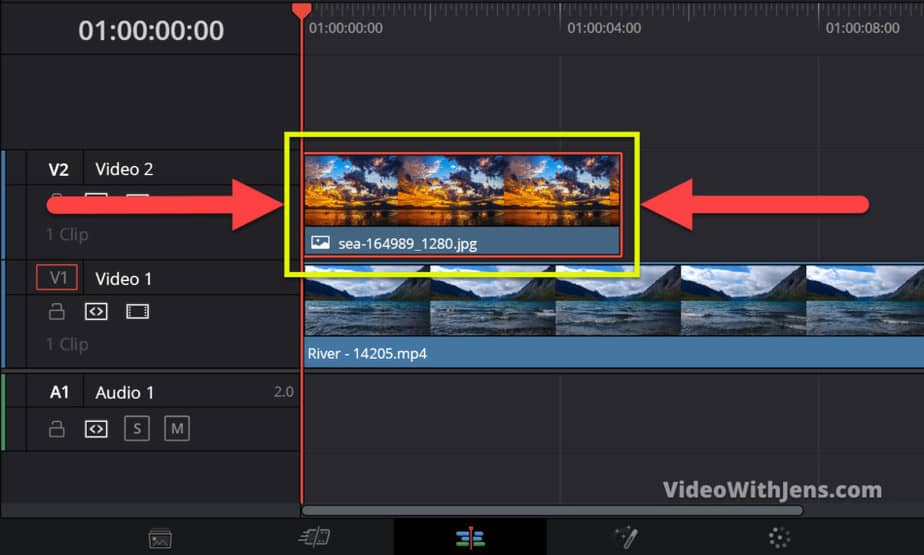
Then you lot want to add the image to the timeline one track above the video.
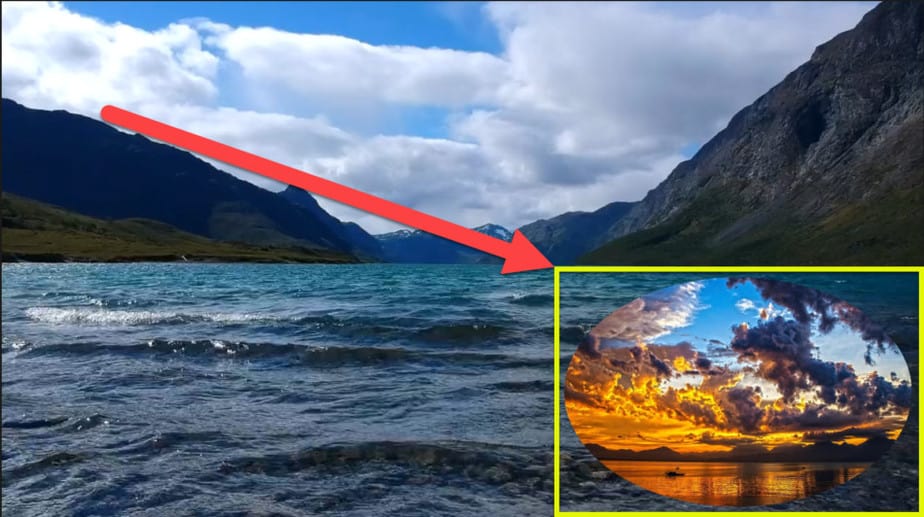
If yous drag the image above the other clip yous'll see information technology's generated a "Video two", drop the image here, like in the picture.
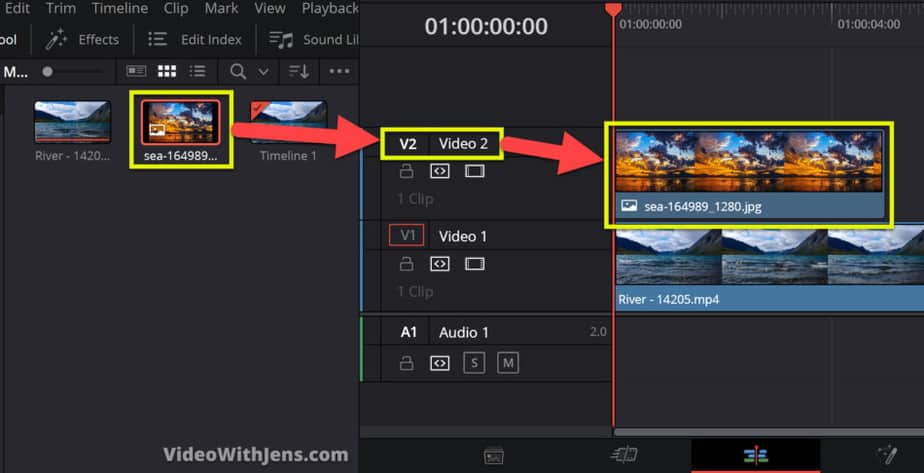
Then you lot'll encounter the image in the video preview, partially or fully covering up the video, depending on its size.
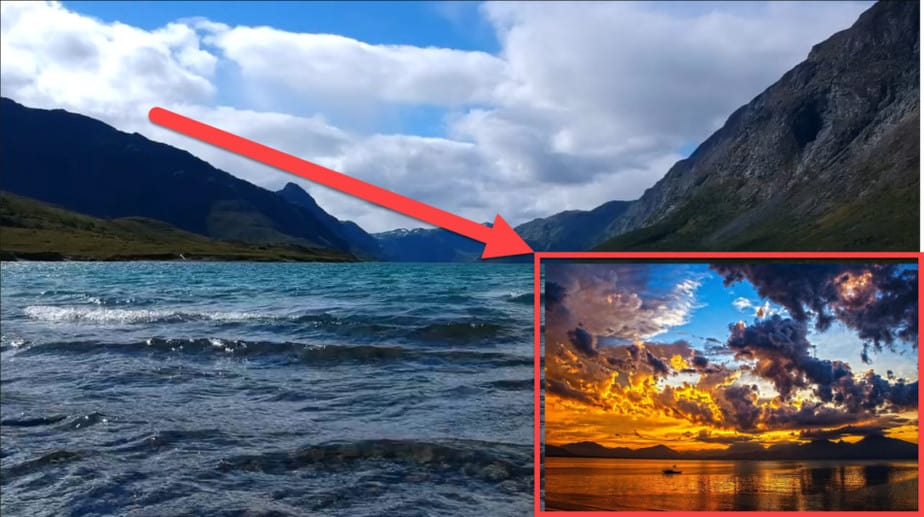
Therefore, the next footstep is to adjust its size and position of it. To exercise this you kickoff have to select the paradigm in the timeline, by clicking on information technology. When information technology's selected you'll see this carmine edge around it:
With the image selected, head over to the "Inspector" tab (located in the right-hand top corner).
Then within the "Inspector" make certain to be under "Video" so "Transform".
Under "Transform" you tin can see the "Zoom" and the "Position".
- Zoom change size.
- Make sure the chain/link icon is enabled, to bear upon width and acme at the same time.
- Position alter the position of the paradigm on tiptop of the video.
- 10 value changes its position horizontally.
- Y value changes its position vertically.
To suit the value, merely hover over the number, click, concord and elevate to either side to increment or decrease the value:
A little further downwardly the "Inspector", yous can see a tab called "Cropping".
Click on the name "Cropping" to open the tab.
Here y'all tin crop the image in all directions, by dragging on the greyness dot to adapt the crop value.
Y'all tin also modify the "Softness" which makes the edges of the prototype smooth:
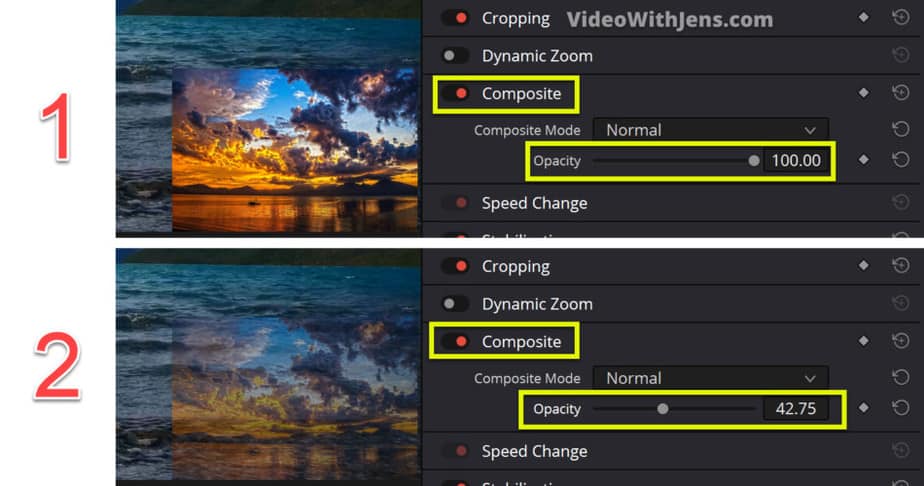
Further down, you also take a tab called "Composite".
Within this tab you lot can change the image'due south "Opacity", simply drag on the grey dot to adjust the opacity.
Here'southward a video where I show you lot how to animate movement to the epitome overlay:
Yous tin can as well make the paradigm overlay in different shapes, like the circumvolve I've fabricated above.
And don't worry, this is actually really easy. You tin can literally do information technology in half-dozen clicks! (I just counted…)
If you don't accept my word for it, you can count yourself.
This is what I want to show you next!
Making the Image Overlay Circular:
In this example, I'one thousand going to keep from where I left off above! The epitome is still placed in the right-paw corner as in the picture beneath:
Then the first click is going to exist used to open the "Color" folio:

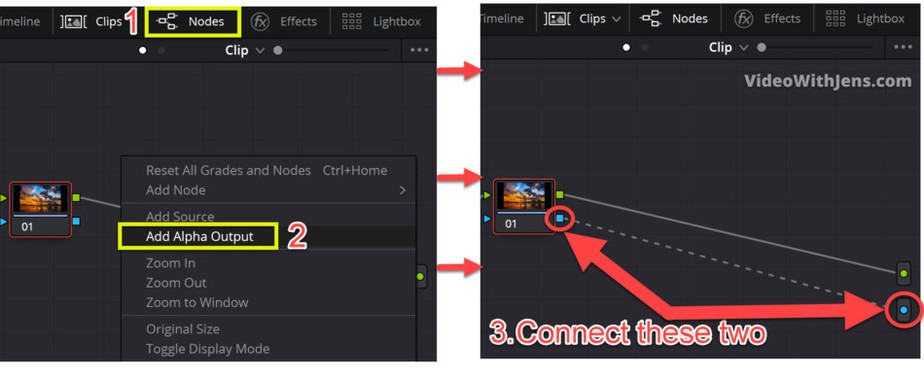
Go to the node graph under "Nodes", located in the right-hand height corner. This 1 is open by default, significant you should not have to spend a click on this one!
Correct-click the background of the node graph (the gray role where the node called "01" is placed). And so click on "Add Alpha Output" (Lookout man the image below).
That'southward 3 clicks.
Notice on the right side of the node called "01", that there is a small blue foursquare.
Click on the square, concord and drag information technology over to the "Alpha Output" and drop it. When they are connected you go a dashed line betwixt them. Watch the image above for reference.
That'southward four clicks btw.
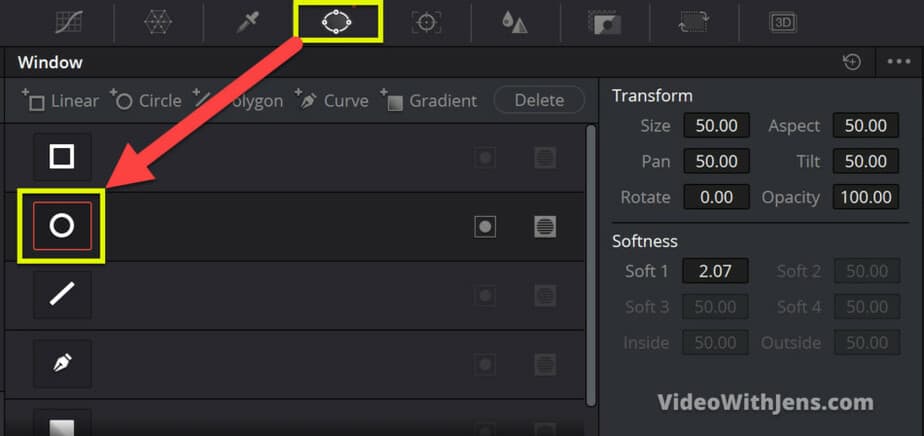
Now, in the toolbar/bar full of tabs in the lower 3rd of the "Colour" folio, there is one that's called "Window". Hover your mouse over the different icons of the tabs to run across their name. A more simple mode is to simply find the tab that looks similar the epitome below…
When you find information technology, click on information technology to open it.
That'due south 5 clicks.
Within the "Window" tab you lot can see some different shapes and such… Here yous want to click on the circle. Once you've washed that it should appear on tiptop of your video in the viewer/preview.
That's half-dozen clicks! And in theory, all the clicks yous need.
Thank you.
However, if you wish to adjust the size and position of the circle, that does not count.
The prototype below is an analogy of what the different dots on the circumvolve do:
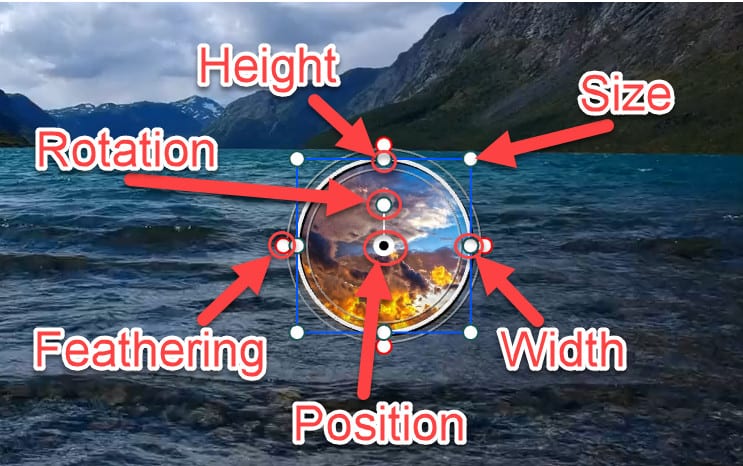
Watch the analogy beneath, to run across how I used them:
How to Make an Paradigm Transparent?
- Go to the "Colour" tab inside Resolve.
- Right-click on the node graph and click on "Add Alpha Output".
- Connect the node to the blastoff output.
- Open the "Qualifier" tab, and click on the "Picker" tool.
- Click on the groundwork you desire to make transparent.
Fix Black Screen With Overlay Image/Video in Davinci Resolve
To set the black layer that appears backside your overlay go to the "Fusion" page inside Davinci Resolve. In the node graph only motion the node chosen "MediaIn" a little. This should prepare your blackness screen if it's caused by a problems with the alpha channel.
How to Add a PNG in DaVinci Resolve
- Become to the "Edit" page inside Resolve.
- Open the "Media Pool", in the left-mitt top corner.
- Import the PNG to Resolve, past dragging the file into the "Media Puddle".
- Drag the PNG from the "Media Pool" and drop it in the timeline.
To add a PNG to Davinci Resolve, showtime, locate where it'southward saved on the figurer. Then open the "Media Pool" inside the "Edit" page of Resolve. Next, elevate and driblet the PNG in the "Media Pool". To add the PNG to your timeline, but drag it from the "Media Pool" and drib it in the timeline.
That'due south it for this tutorial! If y'all desire to know how to adjust the luminance (brightness) like a pro, check out this article.
Best regards,
Your friend, Jens.

How To Add An Image In Davinci Resolve,
Source: https://videowithjens.com/how-to-overlay-image-in-davinci-resolve-helpful-tips/
Posted by: callahanutmacksmay.blogspot.com
0 Response to "How To Add An Image In Davinci Resolve"
Post a Comment